Please try searching something.
Integration Options
Overview
All integration options support one-time and recurring payments. The difference among the integrations lies in the merchant's needs and willingness to spend time and effort for the checkout customization.
| Plugins | Full Page | Embedded Iframe | Payform Web SDK | Direct Post | Host2Host | |
|---|---|---|---|---|---|---|
| Integration effort | Minimal | Minimal | Minimal | Minimal | Average | Experienced |
| UI customization | None | None | None | None | Full appearance | Full appearance |
| 3D Authentication Handling | Automated | Automated | Automated | Automated | Automated | Partially or Fully Manual |
| MPI Use | DECTA MPI | DECTA MPI | DECTA MPI | DECTA MPI | DECTA MPI | DECTA MPI or any third party MPI |
Plugins
Plugins allow you to receive Mastercard and Visa card payments from your customers on your e-commerce website, without redirecting to an external website. It also enables you to generate links, customize your invoices, keep a list of goods and their prices in order, see the real-time credit and debit payment statuses, as well as perform analysis, using individual filters for detailed results.
DECTA can be easily integrated into the billing process of e-commerce websites and mobile apps. If your online store is using Prestashop, Magento, OpenCart or WooCommerce, you can download and set up the ready-made plugin.
Log in to your Merchant Portal account to download a free pre-made payment plugin and set it up in a couple of minutes with almost no prior technical knowledge necessary.
Full Page
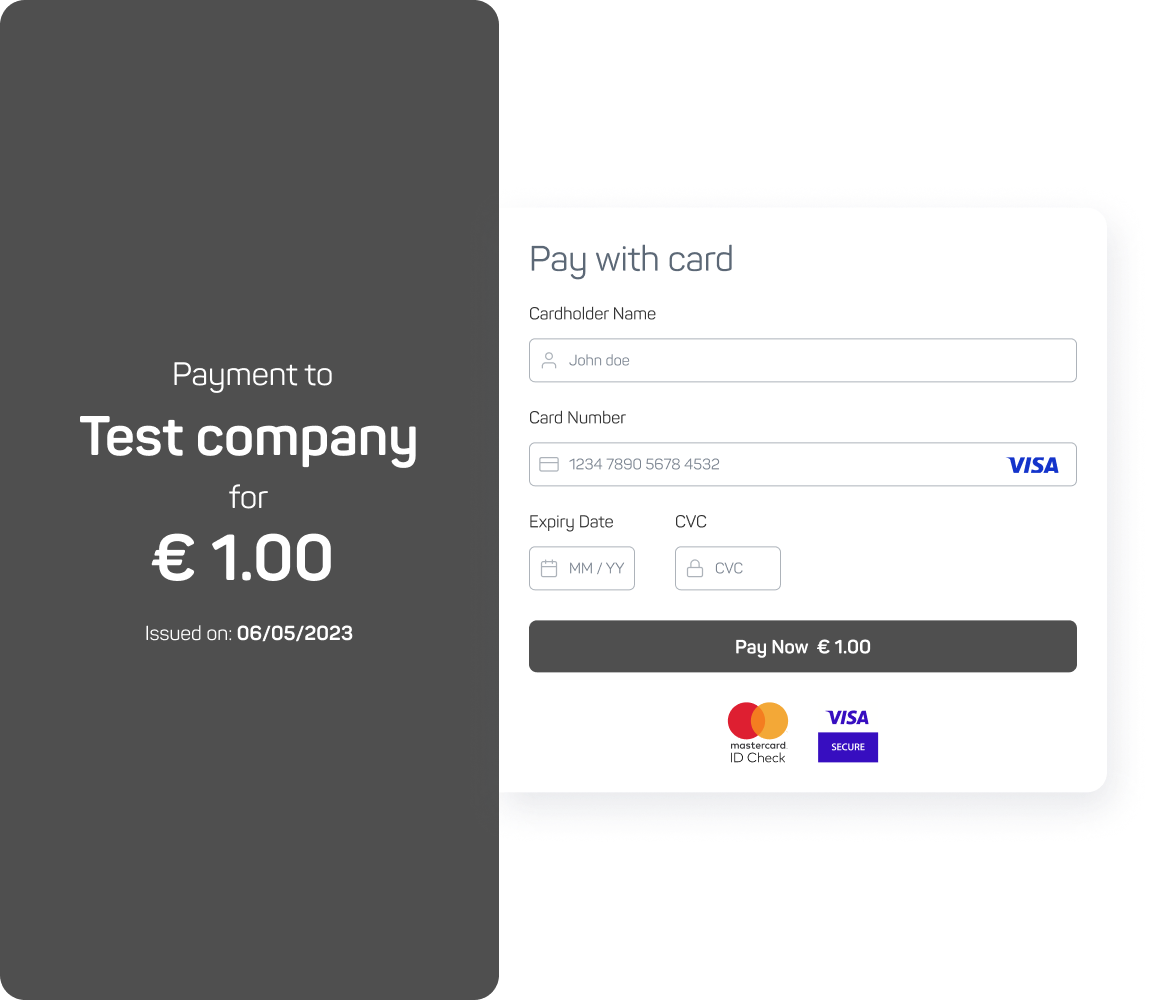
The Full Page integration starts with an order creation. After the order creation, the Full Page checkout URL is returned. The merchant's task is to redirect their customer to this URL, where the payment data gets collected and, if applicable, automatic 3D checks applied. DECTA's Gate will manage the order process from this point. Afterwards, DECTA's Gate will navigate your client’s browser back to your website, using the redirect URL you have configured. All payment data is saved on the DECTA's side. The Full Page integration is asynchronous; hence, after the data collection, 3D checks, and the payment execution, a webhook is returned with the final status. This solution is best suited for merchants who prefer a quick and simple integration.
Embedded Iframe
The Embedded Iframe integration starts with an order creation. After the order creation, the Embedded Iframe checkout URL is returned. The merchant's task is to place this URL in the desired spot on their website, so their customers can pay without navigating away from it. All payment data is saved on the DECTA's side, and, if applicable, the 3D checks are applied. The Embedded Iframe integration is asynchronous; hence, after the data collection, 3D checks, and the payment execution, a webhook is returned with the final status. This solution is best suited for merchants who prefer a quick and simple integration.
Payform Web SDK
Payform Web SDK is a JavaScript library that makes it easier to integrate a payform into your website.
Installation
Before using this library, ensure it is linked from the payform URL https://payments.decta.com/sdk/sdk.min.js in the <head> tag or before the initialization code on your website. Do not copy and store locally the file contents because thus you will miss the updates, which can eventually lead to the service malfunctioning.
Embedded Code
Put the placeholder element in your DOM structure, where you want the payform to be rendered <div data-payment-sdk-form></div>. It can be any element but it has to have the data-payment-sdk-form property. If no such element is found, then the SDK will display an error in the browser console. The wrapper element can be styled with CSS, according to your requirements.
In order to render the form, you must execute the initialization code. You can also load and render it conditionally, depending on your needs. Either way, make sure that the code is executed after the library file loading has been completed.
Before rendering the form, create the transaction ID through the Rest API and then pass the payment ID parameter to JS function.
Example
Please note that 1e118408-a091-4b4e-96bf-e60e1e0e2ff0 is the demo ID and is used only for demo purposes. You must replace it with your own one.
<div data-payment-sdk-form></div>
<script>
  const onPayformload = () => {
    PaymentSdk.Form.create({ paymentId: '1e118408-a091-4b4e-96bf-e60e1e0e2ff0' });
  }
</script>
<script type="module" src="https://payments.decta.com/sdk/sdk.min.js" onload="onPayformload()"></script>
Direct Post
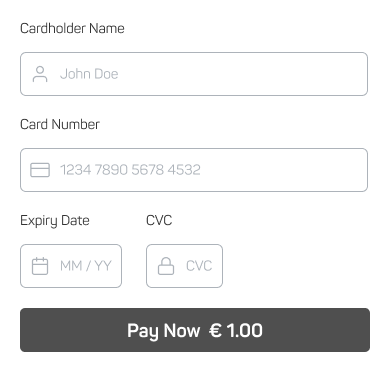
The Direct Post integration starts with an order creation. With this integration method, customers enter their card data into a payment form located on the merchant's website (no redirects or iframe embedding is needed).
Use this element <form method="POST" action="$url"> on your website, where $url is the address you received in the response after creating the order. Once the customer enters their card credentials, they can submit the form and posts their data to our system. We will then take care of their navigation, making sure they pass 3D Secure checks and are appropriately redirected back to either the success_redirect or failure_redirect URL once their order is completed.
Direct Post allows you to keep the card data entry form on your website and fine-tune the checkout process, according to your needs. Additionally, using this method removes the need to comply with the full set of PCI DSS SAQ level D legal requirements and comply with the simpler A-EP instead.
Your brand may be required to provide certain client information for all orders. For the Full Page and Embedded iframe integration methods, the client would be automatically asked to input this information, using the Gate forms. For the case of Direct Post you must provide these fields yourself in the client object. You can check whether your brand has any such fields, using the /brands/:id API. All required client fields will be indicated under the default_request_client_info key.
Process Flow
-
Create an order
. Make sure to provide
success_redirectandfailure_redirectvalues in the request body. Save theidof the created order and thedirect_postURL provided in the response; - Use the
<form method="POST" action="$url">element on your website, where$urlis thedirect_postfrom the previous step. Aside from a method to trigger the native DOM submit event (e.g.<input type="submit">), it should contain the following input fields:cardholder_name- cardholder's name - up to 40 characters, ASCII letters only (as written on the card);number- card number - 13-19 digit integer;exp_month- card expiration month - integer in the [1..12] range;exp_year- card expiration year - integer in the [18..99] range;csc- CVC2/CVV2 code - 3 digit integer;save_card- must be passed to payform only whensetup_future_useparameter has been passed in the order creation request - CheckBox.
- After the customer has entered their data and submitted the form, Gate starts to process the order. Once that is done, the customer is redirected back to your website, using the
success_redirectorfailure_redirectURL. Apayment.paidorpayment.failedevent is emitted. If you have created webhooks for these events, Gate will also perform a server-to-server callback to your system. Once either the customer navigates to your website or you receive the webhook callback, mark the corresponding order as complete in your system. We advise not to rely on the webhook or, especially, the customer navigation alone, so to avoid the risk of brute force attacks and fake requests. Doublecheck the status of the order with Gate (for that you will need theidyou saved on the first step) and make sure thestatusfield ispaid.
Host2Host
API_DO_URL
The functionality of payments through api_do_url links allows you to use the most flexible payment execution flows, including storing customers' card data on your side for recurring payments and usage of your own or a third-party MPI. By using this functionality, you are able to create your own payment forms embedded into websites and mobile applications, or integrate them into your system in any way you need. Using api_do_url payment execution, you can provide the following types of transactions to your customers:
- One-Step/Two-Step transactions (ordinary debit payments);
- P2P transactions (money transfers between accounts of different individuals);
- B2P transactions (money transfers, used by companies engaged in various types of payments to individuals: insurance claims, healthcare reimbursements, legal settlements, loan disbursements, etc.).
Important! As a merchant you have to have a PCI DSS certificate (SAQ level D) to be able to use api_do_url functionality.
In response to the request for a debit or credit transaction to DECTA Gate API, you will get api_do_url link for the payment execution. You can use it to pass the customer's card data to DECTA side and finish the payment through custom payment forms, recurring payments, subscriptions, or any other payment flow you have implemented on your side.
To execute payment, using api_do_url, you need to pass customer's card credentials to DECTA side through an ordinary http POST request to the api_do_url link with a JSON serialized body, constructed according to the specification below.
Process Flow
For the Host2Host integration option, the payment data collection and sometimes also 3D checks are performed on the merchant's side. The flow for the Host2Host integration is as follows:
- Create an order request;
- Create a
POSTrequest to payment api_do_url*; - Perform 3DS authentication (conditional).
*The functionality of payments through api_do_url links allows you to use most flexible payment execution flows, including storing customers' card data on your side for recurring payments and the usage of your own or a third-party ACS servers. By using this functionality, you are able to create your own payment forms embedded into websites and mobile application, or integrate them into your system in any way you need.
Important! As a merchant you have to have a PCI DSS certificate (SAQ level D) to be able to use api_do_url functionality.
Request Example
Step 1: Minimal body request to POST payment api_do_url
{
    "cardholder_name": "Adam Smith",
    "card_number": "4111111111111111",
    "exp_month": 6,
    "exp_year": 23,
    "csc": "010",
    "save_card": false,
    "ip_address": "198.51.100.42"
}
This request may differ for some payment scenarios:
Jump to
- Overview
- Plugins
- Full Page
- Embedded Iframe
- Payform Web SDK
- Direct Post
- Host2Host